This walkthrough demonstrates a (very) simple use-case of ElecNetKit. The goal of this experiment is to measure the change in network voltages due to loads increasing by 10%.
Before you get started with this walkthrough, make sure you've got a proper environment set up for using ElecNetKit. More instructions are provided in Setting up a Development Environment.
A Minimal Working Example
Before we start coding, download the Example Networks Package, and locate the file IEEE13mod.dss. We'll run our experiment on this network.
Create a new Visual C# console application targeting the .NET Framework 4.5. Name it MinimalWorkingExample.
Add the following references (either from local copies, with Project | Add Reference... or with
 NuGet, using Project | Manage NuGet Packages...):
- ElecNetKit.Core - contains the core functionality of ElecNetKit,
- ElecNetKit.Engines.OpenDSS - provides access to the OpenDSS Simulator, and
- System.Numerics - required for interacting with complex numbers.
We need to write an experimentor that increases the size of each load by 10%. Choose Project | Add Class ... and type the name LoadScalingExperimentor.
Modify the LoadScalingExperimentor.cs file as shown:
using System;
using System.Collections.Generic;
using System.Linq;
using ElecNetKit.Experimentation;

namespace MinimalWorkingExample
{
    class LoadScalingExperimentor : IExperimentor
    {
        public double LoadScalingFactor { set; get; }

        //Convenience constructor, to set scaling factor when object is initialised.
        public LoadScalingExperimentor(double factor)
        {
            LoadScalingFactor = factor;
        }

        //Implements IExperimentor.Experiment()
        public List<string> Experiment(ElecNetKit.NetworkModelling.NetworkModel Network)
        {
            return Network.Loads.Select(
                load => String.Format("edit load.{0} kW={1:F6} kVAr={2:F6}",
                                      load.ID,
                                      load.ActualKVA.Real * LoadScalingFactor,
                                      load.ActualKVA.Imaginary * LoadScalingFactor
                                      )
                    ).ToList();
        }
    }
}
Now, we're ready to chain it all together. Add the following using directives at the top of the Program.cs file:
Add the following code to your Main() method:
//Setup a network controller and choose a network definition file
// appropriate to the simulator in use
NetworkController controller =
    new NetworkController(new OpenDSSSimulator());
//Set this to the absolute path to the IEEE13mod.dss file, e.g.
controller.NetworkFilename = @"C:\temp\IEEE13mod.dss";

//Add our new experiment, with +10% load scaling.
controller.ExperimentDriver = new LoadScalingExperimentor(1.1);

//Use a DifferenceTransform so that the controller returns the
// differences between pre- and post- experiment voltages.
controller.ResultsTransformer = new DifferenceTransform();

//Run the simulation
controller.Execute();

//Output the change in voltage at every network bus.
foreach (var bus in controller.Network.Buses.Values)
{
    Console.WriteLine(
    "Bus " + bus.ID + " has changed in voltage (pu) by "
    + bus.VoltagePU.Magnitude);
}
Don't forget to change the path in the above code to the location of the IEEE13mod.dss file!
Build and run the project. You should get output that looks like:
Bus b3 has changed in voltage (pu) by 9.90281601181795E-07
Bus b2 has changed in voltage (pu) by 0.000152791122413823
Bus b4 has changed in voltage (pu) by 6.14747056342346E-05
Bus b5 has changed in voltage (pu) by 6.94041141638226E-05
Bus b9 has changed in voltage (pu) by 0.00919099297670996
Bus b10 has changed in voltage (pu) by 0.00938955885082126
Bus b11 has changed in voltage (pu) by 0.00822162582756408
Bus b12 has changed in voltage (pu) by 0.00929166004717853
Bus b1 has changed in voltage (pu) by 0.000152776792402134
Bus b8 has changed in voltage (pu) by 0.00775142309783684
Bus b7 has changed in voltage (pu) by 0.00794701668149591
Bus b6 has changed in voltage (pu) by 0.00785302751323394
- Note that the implementation of IExperimentor in this example returns a list of strings that define commands to run on the network. These commands are specific syntax to OpenDSS, the simulator used in this example, and will not work in another simulator.
Displaying Network Graphs
Add the following references to your project:
Using either
NuGet or Project | Add References...:
- ElecNetKit.Graphing - provides access to graphing functionality.
Using Project | Add References... | Assemblies | Framework:
- PresentationCore
- PresentationFramework
- System.Xaml
- WindowsBase
 Tip
TipIf you added ElecNetKit.Graphing with NuGet, these framework references should have been automatically added for you. NoteThis last set of framework references are required because ElecNetKit uses Windows Presentation Foundation (WPF) for graphing. In a WPF application, you will not need to add these references - the graphing components will Just Work™.
Add the following using directives, right underneath the currently existing ones:
Add the following code at the very bottom of your Main() method:
That's it! Build and run the program, and behold your lovely new graph:
Graph Output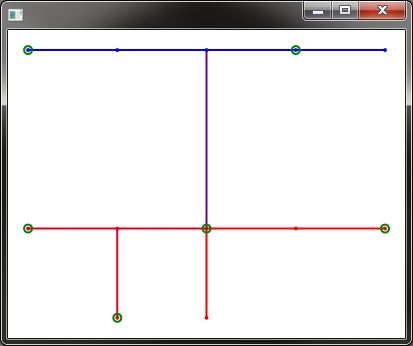
The ElecNetKit Graphing suite is very powerful, and what you've seen here is a very simple example. You might like to take a look at Graphing with ElecNetKit for more information as to what's available.
Now that you've set up a development environment and built a minimal working example, you might like to read about Traversing the Network Model.